Upgrading an enterprise SIEM like IBM QRadar is a critical task that requires careful planning, health verifications, and disciplined execution. Whether applying a routine patch or an SFS software release, following a structured workflow ensures minimal downtime and prevents issues during deployment.
Pre-Upgrade Checklist & Preparation#
-
Download software and pre-checks First, navigate to IBM Fix Central to download the correct
.sfspatch package for your target version. While you are there, grab the latest release notes and verify the checksum (SHA256) of your download to ensure the installer wasn’t corrupted during transfer. -
Before running the patch installer, complete a system health check to confirm that all services, database states, and appliances are in clean working order.
1. Health Checks & Notifications#
- Run Diagnostic Tools: Check system health using deployment health tools (e.g.,
drqor/opt/qradar/support/deployment_info.sh). - Review Alerts: Clear or resolve any unresolved hardware, memory, data replication, disk space, or High Availability (HA) warnings before proceeding.
- Verify HA States: If you run HA pairs, ensure Primary nodes are Active and Secondary nodes are Standby.
2. Backups & Infrastructure Snapshots#
Never initiate an upgrade without backing up configuration and system state data:
- Take hypervisor/VMware snapshots of all virtual appliances.
- Save a fresh configuration backup from the QRadar UI (Admin > Backup and Recovery) and download it to a safe location.
- Ensure external backups for custom data, scripts, and
/store/backup/are complete. - Export custom content:
Terminal window /opt/qradar/bin/contentManagement.pl -action export-content-type all
3. Unmount Previous Updates#
Ensure no lingering update mounts remain across your managed hosts:
/opt/qradar/support/all_servers.sh -k "umount /media/updates"/opt/qradar/support/all_servers.sh -k "umount /media/cdrom"Terminal Session Management (screen)#
QRadar updates can take anywhere from 30 minutes to several hours depending on environment size. Using GNU screen prevents an SSH disconnect from disrupting the upgrade process
# Create a new named sessionscreen -S DN_1
# List active sessionsscreen -ls
# Reattach to an existing sessionscreen -r 4189
Tip: Detach safely from an active session at any time using Ctrl + A followed by D.
4. Staging & Running the Upgrade#
- File Placement & Disk Checks
Copy the downloaded QRadar SFS patch file to a partition with sufficient free disk space (e.g.,
/storetmpor/var/log). Avoid placing installer files directly inside/store.
Note: SFS files stored in /storetmp are removed by the overnight maintenance script (diskmaintd.pl) if left uninstalled.
Verify disk space prior to mounting:
df -h /storetmp /var/log | tee diskchecks.txt- Mount and Launch Installer
Create the update directory, mount the SFS file, and execute the patch script:
# Create mount pointmkdir -p /media/updates
# Mount SFS imagemount -o loop <QRadar_filename>.sfs /media/updates
# Run installer/media/updates/installer
A message asks “Do you wish to continue?”. Enter Y.

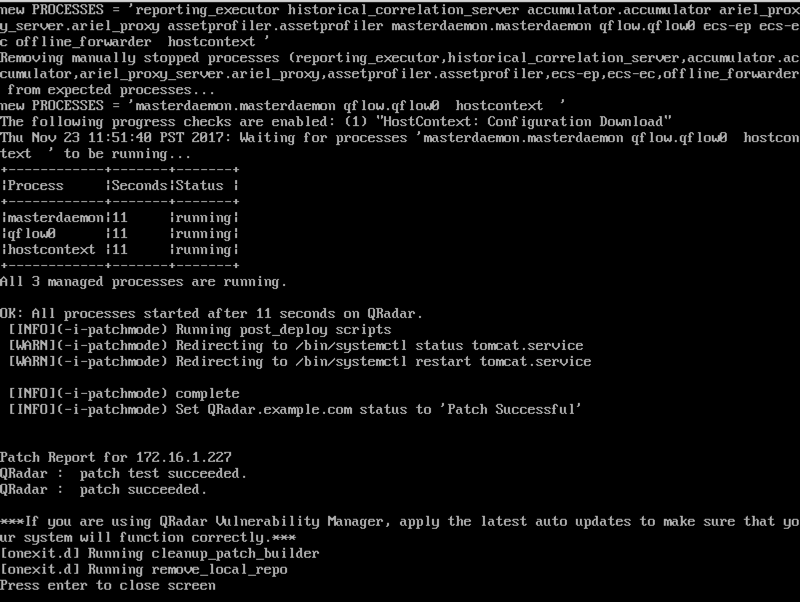
The installation process can take anywhere from 15 minutes to several hours, heavily depending on how many managed hosts you are patching. You’ll see a steady stream of installation messages scrolling by. Be patient when Tomcat restarts—as usual, this step can take a bit of time
When it finishes, you’ll see “patch succeeded”, as shown below.
In your Web browser, log in to the QRadar GUI again
Click the Admin tab.
A message says “There are no changes to deploy”. This is contrary to the IBM patch Release Notes, which say that a manual deploy and release is required after the patch. However, the console showed that this patch automatically performed those steps already.
This is typical for enterprise-class software patches—you can’t always rely on the documents being accurate.
5. Real-Time Log Monitoring#
Monitor upgrade progress in real time by opening a separate terminal tab or screen session and tailing the installation log:
tail -f /var/log/setup-<version>/patches.log(Example: tail -f /var/log/setup-2021.6.1.20220215133427/patches.log)
6. Post-Upgrade Tasks#
Once the installer reports completion across all hosts, finalize the process with these cleanup steps:
# Unmount patch directoryumount /media/updates-
Delete SFS File: Remove the SFS installer file to reclaim disk space.
-
Deploy Changes: Log into the Web UI (Admin tab) and execute a full Deploy Changes.
-
Browser Cache: Clear browser cache and cookies to prevent UI display issues.
-
Verify Software Versions: Confirm all appliances in the deployment are running identical versions:
/opt/qradar/support/all_servers.sh -C -k /opt/qradar/bin/myverQuick Reference Command Cheat Sheet#
| Task | Command |
|---|---|
| Unmount Old Updates | /opt/qradar/support/all_servers.sh -k "umount /media/updates" |
| Check Disk Space | df -h /storetmp /var/log | tee diskchecks.txt |
| Mount Installer | mount -o loop <QRadar>.sfs /media/updates |
| Run Installation | /media/updates/installer |
| Unmount Patch | umount /media/updates |
| New Screen Session | screen -S DN_1 |
| Reattach Screen | screen -r <session_id> |